
Shoulder & Arm Pain When Doing Push-Ups? Try These 3 Exercises
Written by: Andrew Millett
The point of any rehabilitation program is to restore function. Supporting ourselves with our arms is one of the first ways we learn to counteract gravity as human beings. It is important to reclaim this ability, when lost or painful, to move optimally.
Training closed chain movements during the rehabilitation of the shoulder helps us to accomplish this, specifically the push-up. For those experiencing arm and shoulder pain when doing push-ups during rehabilitation, there are ways to avoid pain. Whether you have bad shoulders, a rotator cuff injury, or experiencing pain for the first time, this blog aims to provide sets of exercises to progress back to doing full push-ups.
Push-Up Form
Before we get into the exercises to progress back into full push-ups, let’s take about proper push-up form.
Let’s first talk about hand placement for push-ups. You want to keep your hands and wrists underneath your shoulders or slightly wider. Your fingers should be spread apart, pointed straight ahead or slightly outward. If your wrists are hurting when doing push-ups, it could mean your arms are spread too far apart or are too narrow. Any wrist pain can be a sign to back off or modify your push-up to a level that your body is more comfortable with.
With all push-ups, modified or not, you want to keep your spine neutral. This means keeping your head, neck, shoulders, and back all in a straight line. If you feel shoulder pain during a push-up, it could be a sign that your elbows are too wide or too narrow, not enough pushing force exerted through the hands, and your spine may be out of alignment. Done correctly, push-ups are great for your shoulders and back.
With any of the exercises mentioned below, it’s important to keep these pointers in mind to prevent injury or pain:
Tips on Push-Up Form:
- Neutral head/neck (avoid forward head)
- Shoulders protracted at the starting position, so shoulders look flush with the rib cage.
- Neutral low back (avoid excessive arching during your push-ups)
- Hands underneath shoulders or slightly wider
- Fingers pointed straight ahead or slightly outwards
Closed Chain Movements
What exactly is a closed chain movement? In the case of the upper body, the arm operates while the hand is connected to an immovable object, such as the floor or a wall.
The easiest way to understand this is by comparing a push-up to a dumbbell bench press. Both consist of pushing a force horizontally. During a push-up, your hands are connected to the ground, and the joints “up the chain” are guided and limited by this connection. During a dumbbell bench press, an open-chain exercise, the joints of the arm are free to rotate and change positions unencumbered.
To be in optimal health, we should be able to push ourselves up from the ground, push heavier objects, and catch ourselves if we fall. For these reasons, it makes sense to include closed chain exercises in shoulder rehabilitation.
Closed chain exercises will cause all of the joints and muscles of the arm to work together and thus are good “bang for your buck” exercises. They have been shown to have high levels of the rotator cuff and periscapular activation, to stabilize the shoulder joint.
There are a variety of closed-chain movements, including crawling, push-ups, side planks, bridges, and handstands.

3 Positions of Rehab Exercises
In order to return to avoid shoulder pain while doing push-ups after a shoulder injury, it is helpful to split the rehabilitation exercises into three main positions:
- elevated
- quadruped
- plank
These exercises will help you progress back to doing full push-ups. We will start basic, so depending on the severity of your injury or timeline in rehab, you may want to skip ahead to the appropriate exercise.
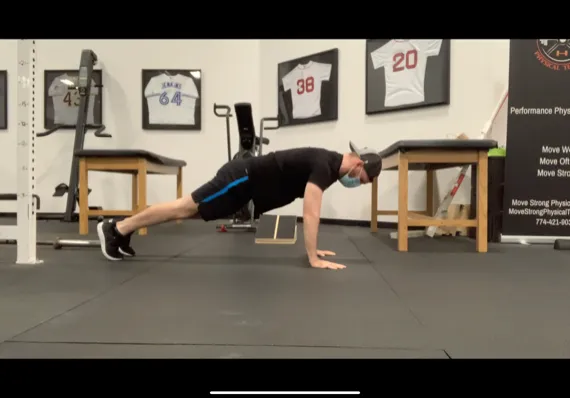
Position #1: Elevated Position
An elevated position is often the best place to begin your closed chain exercise progression. This modified push-up greatly reduces the stress placed on your shoulders, and avoids pain. Use a counter, couch arm, coffee table, etc., to provide the appropriate incline.
- Elevated Plank
- Elevated Plank Foot Lift
- Elevated Shoulder Taps
- Elevated Push-Up
Elevated Plank

Perform push-up holds at whatever height you can without pain, even if you are mostly upright. If you are more advanced, you can start lower.
Elevated Plank Foot Lift
When lifting one foot off the ground, you will naturally shift your weight towards one of your arms. This is a nice transition into using one arm at a time with shoulder taps.
Elevated Shoulder Taps
Improving your shoulder stability will improve your push-up. Elevated shoulder taps are great for training single-arm stability.
Elevated push-up
As you do your elevated push-ups, slowly progress the incline towards the ground. If you can perform 2 sets of 10 at a 60-degree angle, you should be ready to move to a quadruped position. You can continue to train these by progressively decreasing the incline while you are concurrently working on other positions.
Position #2: Quadruped Position
A quadruped exercise is performed on your hands and knees. This is the next position to master after an elevated push-up (unless the elevation is low enough, making it more difficult than quadruped).
- Quadruped leg lift
- Quadruped arm lift
- Birddog
Quadruped Leg Lift
This exercise will use the same principle as the elevated plank foot lifts but will put more weight into the arms.
Quadruped Arm Lift
This will put more stress on one shoulder than the leg lift.
Birddog
Birddogs will increase the stability demands of the shoulder that is supporting you. It will also help increase your shoulder overhead mobility.
Position #3: Push-up Position
It is tempting to skip working on the position, but often push-ups will end up looking ugly if you don’t practice the fundamentals first.
- Planks
- Shoulder Taps
- Push-Ups on Knees
- Banded Push-Ups
- Eccentric Push-Ups
Planks (Arms Straight)
Planks will increase the demand on your core and shoulders. Try starting with 5-second holds.
Shoulder Taps
Hopefully, you are seeing a trend here. Shoulder taps on the ground are just a progression from doing them in an elevated/quadruped position. Widen your feet to decrease the difficulty.
Push-ups on knees
Knee push-ups can feel like an awkward modification to some, but can be a great way to perform push-ups without having to move as much weight, reducing pain in the shoulders and arms. Modified push-ups are a great position to start in, as you are much more in control of the downward force and upward push. Take the movement slowly so you can pinpoint where exactly you feel shoulder pain during your push-up.
Banded push-ups
Like push-ups on knees, using a band can help to lighten the load of your regular push-up.
Eccentric push-ups
Focusing on the eccentric portion of the push-up (lowering down to the floor) will allow your nervous system to recruit more muscle fibers and adjust or modify to the feel of supporting your entire body weight. This video shows 2 different ways of returning to the starting position after each rep. You will certainly feel your triceps activate in this variation, the triceps being another sneaky spot people tend to feel shoulder pain.
_____________________________________________________
If you have completed this progression pain-free, then doing a push-up without arm or shoulder pain should be the next step. This is how you want to treat any physical feat that you are trying to accomplish. Break down the steps, and gradually work your way up to them safely.
If your arms or shoulders are hurting when doing push-ups during rehabilitation, we hope this blog helps you get back to doing full push-ups pain-free.
If you are struggling with an upper-body or shoulder injury that affects your training or day-to-day life, we are here to help. Contact us to take the first step to getting back to doing what you love.
Andrew Millett March 21, 2022
